Strong Lead-acid batteries, popularly known as Deep cycle batteries, are mostly used for the vehicles which need to gain more power in less time. But, on settling them for idle for a long time, they produce the crystals of sulphates which keeps the plates of battery separate from the electrolyte that leads to the short discharge,fast charging, making the battery useless and inefficient, ineffective.

As we all know that the replacement of the dead battery with a new one, almost costs a fortune, will you still choose this as if it is the only option left? Or will you for an alternative? Alternative? What is that?
No matter if you use the best deep cycle battery, every battery does have a lifespan. But Don’t worry, we have an alternative for you to bring back the life of your dead battery. Save life, save the bucks, by just having knowledge upn the voltage of your battery. Wondering how? Here we are, presenting this article to educate you towards reviving the life of a dead battery.
Come, let us guide you through the process of reviving the battery.
NOTE:
Note that, Only deep cycle wet/flooded batteries can be watered. YOU SHOULD NOT WATER THE AGM/GEL deep cycle batteries.
Steps:
1.Watch out your safety:
Before going through the process, wear gloves, protection glasses and rough clothes THROUGHOUT THE PROCESS as you are dealing with an acid material which can burn your skin and damage your organs.
2.Cleaning the battery:
Keeping the batteries idle for a long time leads them towards corrosion. If you see a white powder somewhere around the battery, know that it is corroded.It is a toxic material which should be washed off. For that prepare a baking powder solution (a gallon of water mixed with a pound of baking powder). It helps in rubbing the corroded material of acid harmlessly.
Then, take off the terminals off the battery using the suitable wrenches and clean the clamps with the baking powder mixtures and a brush smoothly.
On completing that, clean the battery with a dry cloth and check for any cracks damages. If everything is okay,apply petroleum jelly on the terminals and there, we can move on to the next step.
3.Detaching the cell lid and filling the battery cells with distilled water:
Here is what the restoration of the battery’s life starts. Using the screwdriver, remove the cell lids from the battery. Make sure that while doing this, no other material, be it dirt or debris go into the battery cells.
You should use distilled water to fill the cells. Before going to the filling process, why distilled water? Because the undistilled water contains hydrogen and oxygen and if it remains in the battery later, it may cause the sparks or explosions.
In the filling process, fill the water in each cell based on the size of the battery and the level of acid the cell contains. Make sure that the water doesn’t overflow.
If your battery starts to work immediately, don’t be surprised. It is bound to happen. Then, charge it with a regular battery charger.
4. Connect the battery to a resuscitator:
On Connecting to the regular battery charger, if it starts to charge, leave it for a while. Else, purchase a battery rejuvenator. A battery rejuvenator helps in powering the plates of a battery, thus causing the sulphates accumulated in between, breaks. Once the accumulated sulphates get removed, you can charge the battery once again. This time, successfully! If not, repeat the same process (Step 4).
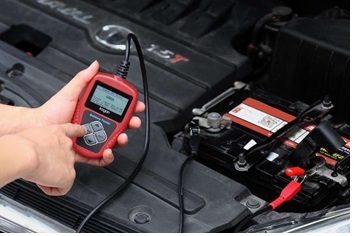
5.Test the voltage of your battery
Once you are done with the charging thing, check the charge your battery is holid up with a voltmeter. If it is good, leave it idle for a few days and recheck again. If the result is the same, It is almost working as a brand new and you can directly install it into your vehicle.
Awesome, right? Why to waste the money when you have a good no.of alternative options to change the old one as a brand new one? Come, let us explore a method to recondition a car battery this time.
RECONDITIONING/REVIVING A DEAD CAR BATTERY USING EPSOM SALT:
A dead car battery doesn’t cost a few bucks that one can easily afford for its replacement frequently. It may cost a lot based on the severity the battery’s condition has fallen into. Wonder how? Sulfation acts as the villain here. It acts as an irreversible corrosive activator that blocks the passage of electric current when it spreads over the lead plate.
Petrified while calculating the bucks you need to put on, already? No worries. We have got your back.
Yes! You can recondition your dead battery easily for 3 to 5 times. Excited enough? Let’s zoom in.
Steps to recondition the deep cycle battery:
1) Dealing with the dead battery means dealing with the strong acids which may burn your skin into holes in case of spillage. So, wear the protective masks, gloves, shoes, apron and goggles.
2) Before you deal with the battery, first, you need to clean around and against the battery terminals with the paste of baking soda and distilled water, to remove the corrosion. You can use the toothbrush to clean the area with the paste. If the corrosion is hard, use sandpaper grit.
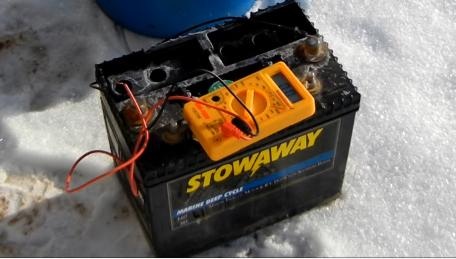
3) Once the surface area gets cleansed, take the voltmeter to measure the readings of the battery ensuring the correct connection to the terminals.
4) Voltage reads 12.6V or more? Your battery is in perfect condition. If the reading is in between 10V to 12.6V, it needs reconditioning.
5) Sure about reconditioning? Now, slowly remove the battery caps with the help of a screwdriver and gently, pour the old battery acid in the battery into a bucket without spillage, keeping the battery away from you. Once you pour the whole old electrolyte into a bucket, neutralize it with half kilogram of baking soda.
6) Now, to clean the inside portion of the battery, take the baking soda and distilled water solution in a 2:1 ratio and pour it into the battery, thereby, shake the battery gently by closing with caps and leave it for a minute. After a minute, remove the caps and pour the mixture, off the battery, into the bucket of previously neutralized solution.
7) The electrolyte is generally made of Epsom salt and distilled water. So, take 120 grams of Epsom salt into one liter of distilled water and stir it with no solid left within. Once the electrolyte is made, fill each cell of the battery and cap them.
8) It’s time to check whether the reconditioning process worked perfectly or not. For that, take the battery charger and connect the red wire to the positive terminal and black one to the negative terminal. With the charge around 12 V/2 Amp, leave the battery to charge for 24 to 36 hours.
9) Once the charge is done, detach the charger and note the voltmeter readings. Readings are 12.42V or a bit more? There it goes, reconditioning is done, and you can go for load test and thereby, note the voltmeter reading again. It should maintain 9.6V after load test. Else, de-charge the battery completely and recharge it again for next 24-36 hours.
Precautions:
1) Make sure you wear all the protection wear.
2) Don’t use tap water which may contain salts that are harmful to mix up with either the acid mixture or for electrolyte purposes.
3) Dead car batteries contain acids and gases that are flammable. Make sure that there us no fire or explosive substances while reconditioning the deep cycle battery.
Alternative for Epsom salt:
You can use copper sulfate or Aluminium Sulfate (1:1 ratio) in the place of Epsom salt.
In this way, you can always get the best out of the waste too. All you need to do is to find a way. Just find a way, an aid, and become a science man!